SM 5 BSZ - Dynamic Range of 2 m Transceivers Part 2: Modifications to the TS 700
Published in VHF communications Nr 2 1982.
The noise sidebands that accompany the transmit signal of the TS700 are relatively strong at a spacing of +/- 100 kHz or less. They originate in the DC-converter of the power supply circuit. The converter produces a 600 Hz square-wave signal. The steep slope results in spikes that cause an amplitude modulation of the transmiMer, which in turn increases the signal bandwidth to +/- 100 kHz.
The modifications described in this article ensure that the 600 Hz signal cannot reach the transmitter, thus eliminating the amplitude modulation and the interference sidebands.
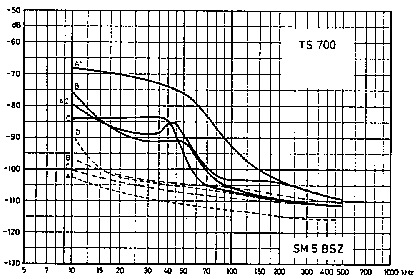
Figure 1 shows the noise sidebands of some TS700 transceivers before modification (continuous lines), and after modification (dashed lines).
The curves designated with "A¢ are from an older unit, which was defective during the first measurement (A 1). The cause for this were loose nuts used for mounting the board in the power supply. After tightening the four nuts, the transceiver exhibited normal, typical values (A 2). After publishing this article in "Radio och Televisiom" the author received a number of letters that indicated that many such transceivers have this problem.

Fig. 1: In the TS700 the noise sidebands are caused by 600 Hz pulses from the DC converter. Massive lines = 4 different transceivers in their original states; broken lines = after modification
1. The first step in improving the interference sidebands of the TS700 is thus simple: Tighten these nuts so that the power supply has a good ground connection.
Curves B and C are from transceivers of more modern construction. Transceiver D was only measured after modification; it is not known whether it is an older or newer model.
Very high currents of the 600 Hz spikes flow within the power supply. The selection of the ground points is therefore very critical. The ground points of the 9 V stabilizer have not been carefully selected, and for this reason, the second and third steps of the modifications are in improving the ground connections of the 9 V stabilizer circuit. These are carried out as follows:
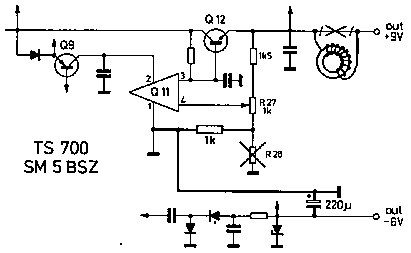
2. The ground pin of the integrated stabilizer (Q11, pin 1 ) is connected to one of the previously mentioned nuts by connecting a copper wire of at least 2.5 mm diameter from the upper side of the IC to the nut, and soldering it into place. That nut should be used that is nearest to the 144 MHz power amplifier.
3. The ground end of R28 is now connected to pin 1 of Q11. The upper end of R28 is now cut and a new 1 kiloohm resistor connected from the loose end of R27 to pin 1 of Q11 (from above).

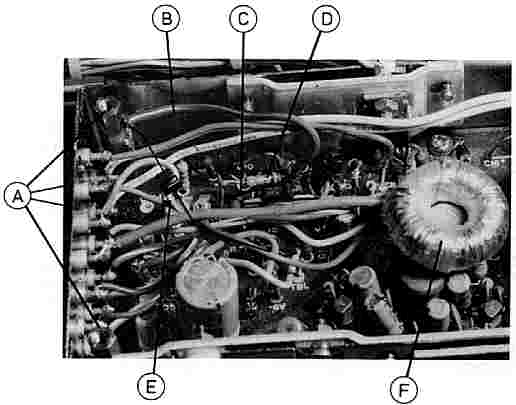
Fig. 2: These are the modifications:
A: Tighten all 4 bolts
B: Soldera heavywirefromthebolt in the upper left-hand corner to pin 1 of Q11
C: Cut the old resistor
D: Put in the new 1 kiloohm resistor
E: This iswherethe 220 microfarad electrolytic capacitor finds its place
F: The toroid-core choke
Newer TS700 also require a further modification: Although steps 2 and 3 have reduced the AC-voltage on the 9 V line (especially at lower frequencies), the 9 V-voltage is still not clean enough,and it is necessary to carry out step 4.
4. Unsolder the connection from the 9 V stabilizer to the transceiver and insert an AF choke. Since this is not critical, a readily available Ferrite toroid core (material 4 C 6 violet) was used whose dimensions were 23 x 14 x 7; it was then provided with 30 turns of enamelled copper wire of 0.8 mm diameter. The choke should have an inductance of 50 microhenry or more, and exhibit a low stray field. The toroid cores should be insulated with a little plastic tape and clamped into position between an electrolytic capacitor and the cover of the power supply.
Older TS700 transceivers also require two further modifications. Since it is difficult to judge whether they are necessary or not, it is recommended that they be made in all cases.
5.Solder an electrolytic capacitor of 220 microfarad or more from the - 6 V connection of the power supply to the nut that is already used as ground point for Q11 described in step 2.
6.Solder an electrolytic capacitor of 1000 microfarad or more between
fuse F2 (2 A) in the 20 V line and the ground point at the center
of the rear panel.
Figure 2 shows the modifications 1 to 5, and Figure 3 shows the
appropriate part of the circuit.

Fig. 3: Part of the circuit diagram where the
modifications have to be carried out
As can be seen, the TS700 is very easy to modify. In order to carry out steps 1 to 5, it is only necessary to remove the cover of the power supply (4 screws). The required components are: 1 resistor, 2 capacitors, 1 toroid core, and a length of enamelled copper wire.
After carrying out these modifications, the residual noise sidebands originate from the white noise of the amplifier chain. In a later article of this series, it will be shown how the narrow-band noise sidebands can be reduced for several transceiver types. All transceivers will only have white-noise sidebands after modification.
Many of the transceivers have two-tone dynamic ranges of approximately 115 dB. For this reason, the author hopes to show in a later article how the white noise can be reduced below this value, which seems possible for a number of types.